Compress video and image files without degrading quality.
Nowadays we need to Compress video and image files frequently because most of the schools and colleges are closed due to COVID-19.
Even those which are open, education is not being done properly due to maintaining social distance.
In such a situation, most of the students are only able to continue there study online.
So most of the students and other kinds of learners need any type of course or tutorial to continue an online education. And this course or tutorial is usually in the form of audio or video files, and these audio or video files are usually very large (high no of bytes).
Needs to compress video and image files:
We worry about how to compress video and image files. Apart from this Nowadays, it is the era of the Internet in which the trend of multimedia, and social media, etc. has also increased.
Apart from this, there is a problem of transferring these big videos and images files online or posting to social media because every app has a limit and more than bytes videos are not supported.
Therefore, we need to compress video and image files, for which software is needed that compresses the videos and images but does not spoil the video and image quality.
The Properly compress video and image files you'll be able to upload or download it faster and in some cases, playback will be smoother this is all without noticeably impacting the quality of the video and image files at all compressing reduce the file size of a video and image files so it takes up less space on your hard drive.
For example, a 200-megabyte video can be compressed down into a 10-megabyte video with no visible difference.
But I am going to tell you here a way by which you will not need internet every time to compress any video and image files, for this you will need to download two software applications only once and then without an internet connection, you can Compress video and image files as many as times you require.
How to download handbrake:
There are many apps in the market to do Video Compress, but out of these, the free and best app is Handbrake, today we will tell you how to compress a video through it very easily.
Handbrake is one of the easiest and best programs out there for video compression it's also free and open-source so simply search up the handbrake and click this first link of google search here or you can go direct to https://handbrake.fr/ and then you go ahead and download.
Apart from this, you can also download by clicking on the button given below. download and install the app.
Install it after downloading the app, it is very easy to install it just accept, next, next, it will become app install after installing it will start to appear as a Symbol on your screen.
Procedure to Setting for compress any video file:
To compress any video file, first click on the symbol of the handbrake on the screen, you will get the opening interface of your app as soon as you click.
First, you click on any one of the blocks number one or three, After clicking you will get the option to upload the video file from PC or laptop. Apart from this, you can also upload any video file by drag and drop on block number three.
The first page will open as soon as the video file is uploaded in the app. All the settings options required to compress any video file are available on this page. To compress any video file, it is adjusted by seven pages (A,B,C,D,E,F, G), whose details are as follows.
Summary page -A:
First of all, select the size (pixels) of the video file to be compressed, for this, 16 types of (Preset) sizes are given in the (H) box on the right side of the page, select the size (pixels) as per your requirement.
Normally it is selected at the tick position. This means that the output width of the compressed video file will be 1200 megapixels and the height will be 720 megapixels.
Then you select the K box and tick on that.
After that you select the format of the output video file through J box, Normally it is selected in the MP4 mode.
Now on this page, you don't have to make any settings.
Video page -D:
You can select the output video file frame rate/Sec by box number 1 on this page. And it is usually selected at 30frame/Sec.
After this, select box number 3 and tick on the Constant frame rate option.
The compressed video file size (Mb/Gbites) is reduced or increased by box number 2. Here there is a slider that is moved forward or backward to set the size (Mb/Gbites) of the compressed video file and its range is set between 22 and 30.
The more its range will increase the size (Mb/Gbites) of the compressed video file will decrease, but the video quality will also decrease and the lower the range, the quality of the compressed video file will also increase.
It is usually set to 25 with the help of a slider so that both the quality and size (Mb/Gbites) of the compressed video file is fine.
The speed of compressing a video file can be accelerated or slowed by the slider of box number 4 but its settings are not changed and it is sustained in the default settings.
Now no other adjustments are made on this page.
In this app, the setting required to compress a video file is completed now. remain to keep all the settings of the other page (B,C,E,f,G) as it is.
The process of compressing a video file:
If you want to save all the settings you have made to compress a video file So far then click on box A On clicking, a popup window will open in which you write a name at the box B, you must write the name with which you want to save all the settings.
After that click on the C box, all these settings will be saved with the name you wrote in the popup window and this name will start appearing in the sidebar. It will be beneficial that whenever you want to compress a video file in the future, you only have to click on this name once and this whole setting will be done automatically.
After this, you click on box D, as soon as you click, the option to choose the name and location of the compressed video file will appear in your Os System. By which save the name and location of the compressed video file in your Os System.
Then you click on the box E, your video file will be beginning to compress.
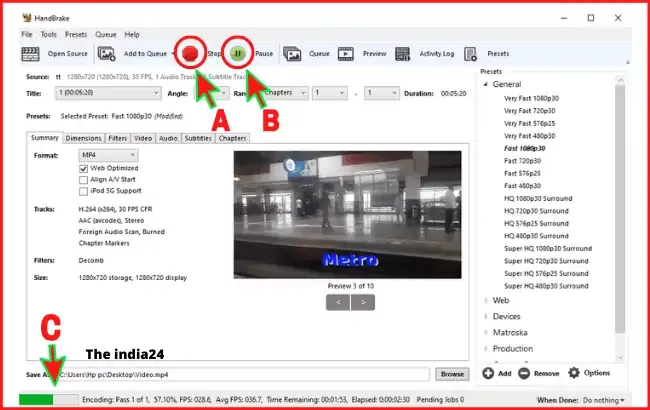
After the process of compressing the video file has started, you can stop by clicking on box A and if the process of compressing the video file is to be a pause in the middle, then it can be done by clicking on the box B.
Through box C you can see the details of the completion of the compression of the video file by the move of the green color.
Once box C is completely green, your video file is completely compressed. Now you can check the property of the compressed video file by right-clicking that how much compressed the video file.
Procedure to-Images Compress:
Often the size of a photo file taken from a camera or mobile is very large i.e. up to several hundred Kb (Bytes), due to which the problem of using these image files in any type of online is either difficult or can not use these images files.
These large image files cannot be used for popular social media or government work, especially on the application form of government jobs/vacancies.
Therefore we need to reduce the size (Bytes) of these images, but also keep in mind that the Bytes of the images are reduced but do not deteriorates the size Pixels (width and height) and quality of the images.
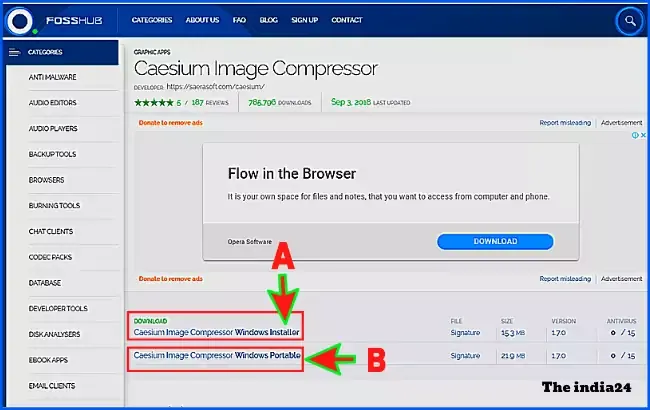
For this, you have to download a software named Caesium which can be done by c ing the button below, or you can also download it through Google search by the link of https://saerasoft.com/caesium/.
How to download Caesium:--
You can search for https://saerasoft.com/caesium/ on Google to download the Caesium Image Compressor app.
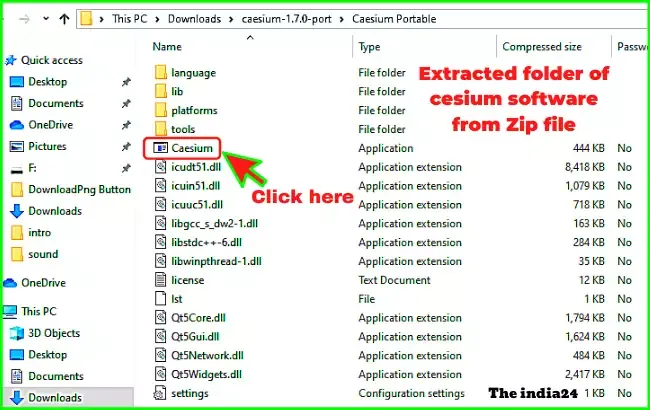
Click on the caesium application file on this folder, the caesium software will open in front of you.
Procedure to Setting for compress any image file:
Box A & B:
To compress an image, click in box A or B. On clicking, the option to upload the image from your system appears through which upload the image in this app.
Apart from this, right-clicking on this app also opens the option of image upload.
Box C:
The quality of the output image is set by moving the slider of this box, which ranges from 10 to 40.
40 means the quality of the output image is very good, and the size of the file is large and if set to 10, the size of the output image file will be reduced greatly and there is a slight difference in the quality as well. It is usually set at 25.
Box E:
If you want to make any change in the width and height of the compressed output image, then tick this box, box F and box G will appear as soon as you tick it, enter the width and height of the output image.
If you do not want to make any changes in the width and height of the compressed output image, make untick this box then there will not appear of the option of box F and box G.
Box H:
Through this box, you have to set the location and path of the compressed image to be stored in the system.
Box D:
By clicking on this box, the original image will appear in the input box 1 on the right side and the compressed image will appear in the output box 2.
Apart from this, 6 types of information related to the images are given above, which are as follows.
- J- In this box, the size (Bytes) of your original image is shown.
- K- The size (Bytes) of your compressed output images is shown in this box.
- L- From this box, it is known that compressed output images how much percentage have decreased from your original image.
- M-Through this box, you know the width and height (Pixels) of your original image.
- N- Through this box, you know the width and height (Pixels) of your compressed output images.
- O- Through this box, you can get information about the location and path of the compressed output images to be stored.
Box Q:
Check all the above information, if any correction is required then make the correction, then click on the box Q. As soon as you click, your image will be compressed in a few seconds.
Conclusion:
In this way, you have seen how easily compress video and image files as per your requirement, without degrading its quality. How did you like this article, please let us know through the comments?


If you want to compress the image file size, then use this tool on your device.